


")
")

 Taking HDR vertoramas is a difficult task. You have to shoot multiple sections, each with at least three exposures. These sections have to fit together well such that the stitching will not cause problems. The ambient light is usually very low (e.g. in a church) and the final composition of the stitched vertorama is not obvious while you are shooting the source images. In an earlier post, I have explained how to master these challenges when you are shooting hand-held. In this post, I will give you a detailed explanation of this process when you are using a tripod. You may think that using a tripod makes thing a lot easier. However, both (hand-held shooting and tripod shooting) have their challenges.
Overview
Shooting vertoramas from a tripod is a totally different story than shooting hand-held. While the basic principles are the same, there is much more gear to master, and the fact that you can use a different range of camera settings changes things. I am going to explain the following basic things:
- The gear you need to accomplish the task
- The tripod and camera setup
- The technique of actually taking the shots
Requirements and Assumptions
I assume that you have a decent tripod. When I say decent, I mean not one of those cheap crappy table tripods. You need stability. Since you will have to carry the tripod around, I recommend a carbon fiber travel tripod. Those minimize the weight, have small dimensions when folded, and offer good stability. But be aware of the price tag. These tripods are not cheap. In principle, however, any reasonable tripod will suffice.
I also assume that you have a wide-angle lens. Focal lengths of 10-20mm (15-30mm on an APS-C sensor) are recommended. Note, however, if you want to produce interior vertoramas like the one depicted above, you should really get a super-wide-angle lens that goes down to about 10mm (15mm on an APS-C sensor). Otherwise, your field of view will be too narrow cutting off vital parts on either side of the final image.
The Gear
The big advantage of shooting hand-held is that you do not need any gear (except for your camera, of course). However, you pay a price for that since you need to use wide apertures and high ISO levels to get an acceptably high shutter speed. Additionally, The vertorama may not stitch perfectly due to parallax errors, causing all sorts of trouble in post-processing. Using a tripod lets you maximize the quality of your source images. However, a tripod is not enough. You need a panorama adapter to get the job done.
A pano-what??? A panorama adapter (or panorama head) is a device that you screw on top of your tripod and that allows you to rotate your camera/lens combination around the nodal point (also called the no-parallax point) of that combination. The nodal point is the point that avoids parallax errors when you rotate the camera around it. This means that the overlap of the different sections of your vertorama (or panorama) will perfectly match. The nodal point is different for each camera/lens/focal length combination. Therefore, you need an adapter that lets you adjust the camera mounting.
You may say: “So what? Let’s go ahead and buy one of these adapters and get on with it!” Well, there are a few problems with panorama adapters:
- They add weight to your gear (in some cases up to 1.7kg).
- They add instability to your whole setup as they usually consist of several movable elements flexibly screwed together.
- They are usually very bulky as they need to fit camera models and lenses of different sizes.
- To transport them conveniently, you need to fold them together or disassemble them. Assembling and disassembling them requires extra time and effort limiting your flexibility and efficiency.
- The can be very, very, very expensive (up to €750 which is roughly $1070).
I have looked at the alternatives on the market and was not too happy with any of them. Therefore, I have composed my own adapter from parts that you can buy on the Internet. This adapter is optimized for my purposes and represents the ideal compromise between flexibility, weight, cost and stability (at least for me). Below, you seen the complete adapter with explanations of the individual parts.

Complete panorama adapter (including L-bracket that is normally permanently attached to the camera)
The Parts
Let us run quickly through the parts that this simple adapter is composed of:
 Feisol ball head CB-30 |
The Feisol CB-30 ball head that came with my Feisol CT-3441 tripod is the basis. The groove on the side allows you to put it into vertical orientation. Using this very ball head and/or tripod is not required. Just make sure the ball head you use can be put into a vertical position and offers enough stability to hold the adapter plus the camera. This should be possible with most models.The tripod with the ball head costs about €400 (~$570). |
 Quick release plate |
The quick release plate of the Feisol tripod goes onto the ball head, and we are going to attach the panorama plate on top of it. With this plate (which comes with the ball head), you can quickly and easily unmount the panorama adapter from the ball head and mount only the camera since the L-bracket (see below) that is attached to the camera also fits into the ball head clamp. Very flexible! |
 Novoflex panorama plate |
The Novoflex panorama plate enables us to smoothly rotate the camera around a well-defined point (the nodal point). The screw on the right lets you fix the position, and a scale in degrees around the plate helps you in rotating the camera for equal amounts between shots. There is a marker on the rotating part (blue rim) that makes it easy to rotate for a predefined angle. The panorama plate costs €109 (~$155) |
 Kirk long rail |
The Kirk Long Rail Plate enables you to adjust the camera such that it rotates around the nodal point of the lens for avoiding parallax errors in the stitching process (see below for details). The camera is attached to the clamp on the lower left while the longitudinal adjustment is made by sliding the rail back and forth in the clamp on the upper right which is screwed to the panorama plate. The long rail and the additional quick release clamp (long rail comes with only one clamp) costs ~€129,50 ($184,95) |
 Kirk L-bracket |
The Kirk L-bracket is firmly screwed onto your camera and combines two quick release plates (a horizontal and a vertical one) that let you quickly change the camera orientation. Using this L-bracket, you can attach the camera to the long rail in both orientations within seconds. It is very compact, and since you can slide it left and right in the clamp on the long rail, you can adjust the camera’s lateral position such that the center axis of the lens is exactly on the center axis of the long rail.The L-bracket costs ~€90 ($129,95) |
 Spirit level |
A spirit level that can be attached to the hot shoe of your DSLR helps you in leveling your camera. This devices costs about €8 (~$11). |
The figure below shows what the adapter looks like after you assembled it, mounted it to the tripod, and attached the camera to it.

The camera mounted to the adapter after assembling the parts
The overall cost of this adapter (not including the tripod and ball head) is about €340 (~$480). This is not really cheap, but it is comparably cheap for a panorama adapter. Moreover, this adapter is as small as it can possible be. This is important for two reasons: 1. you do not have to carry bulky stuff with you and 2. it translates into stability and thus into image quality. With a weight of 580 gr, it is one of the lightest.
However, please note that this is a single-row adapter. This means that you can only rotate in one direction. With other adapters that you can buy, you can rotate around two axis and thus take multiple rows of images which enables you to create complete spherical panoramas (360° x 180°). But for taking a nice vertorama of a church, this adapter is sufficient.
Finding the Nodal Point
There are tons of information on what the nodal point is and how to find it. Therefore, I will skip this part here and just give you a few links to explore:
- an article by Rik Littlefield that explains the theory behind it,
- a detailed written and illustrated explanation by John Houghton and
- two videos on YouTube: video 1 shows the setup with a classical panorama adapter while a device similar to the long rail is used in video 2)
This information explains the general principle: you need to adjust the camera position on the adapter both in longitudinal direction (parallel to the optical axis) and in lateral direction (perpendicular to the optical axis). For doing this with this simple adapter, use the two quick release clamps as shown in the figure below.

Adjustment of the camera to find the nodal point
Follow the procedures given in the texts and videos given above and adjust the camera position using the clamps until you have found the nodal point. It is important to note that the nodal point is different for different lenses and for different focal lengths of the same lens. For panorama and vertorama shooting, the focal length should be as low as possible. For example, I shoot all my panoramas and vertoramas with my Sigma 10-20mm lens set to 10mm. You should pick your widest lens set it to the minimum focal length and find the nodal point for that setting. Once you have found it, you may want to make a mark on the long rail that helps you to quickly find this position again.
Finding the Right Rotation Angle

Animation illustrating the rotation
When you have found the nodal point, there is only one thing left to find out before you can go out and shoot. Between two series of bracketed shots (called sections), you need to rotate the camera such that the images overlap by at least 30%. Take a look at the source images in the before and after comparison of one of my vertorama shots to get a feel for an overlap that works well. With my Sigma lens set to 10mm, I use an angle of 30°. I could also use a larger angle which would reduce the number of images I have to take but this works well for me. The procedure is as follows:
- Set up the tripod with the camera mounted on the panorama adapter
- Look at the scale on the panorama plate and write down where the marker stands.
- Look through the view finder and fix a point right at the upper edge of the frame with your eyes.
- Rotate the camera in counter-clock-wise direction (down) until that very point is about a third away from the lower frame edge.
- Look at the scale again and write down where the marker is.
The difference between those two positions is the maximum angle you should use in a rotation. Round that to the next lower multiple of ten to make it easier. E.g. if the difference is 34°, you should use 30° in your rotations.
So now you have your panorama adapter ready, properly adjusted, and tested. That’s it! Time to go out (or in) and shoot!
Preparation and Shooting
When you are at the location, there are a number of things to consider and a certain procedure to execute in order to produce the source images. Let us go through this procedure step by step:
- Ask in advance whether using a tripod is permitted: Before you start setting up your stuff and start shooting, you should make sure that tripods are permitted. E.g. in many churches and museums they are prohibited. Asking in advance saves you stress and gives you the calmness necessary. Otherwise, you may find yourself in a hide-and-seek game with the local authorities, and this does not help you in any way.
- Find the right position: Of course, choosing the right position is up to your photographic creativity. However, in a vertorama shot with an ultra-wide-angle lens any kind of asymmetry does not look good. The classical position would be straight down the center aisle of a church. In that case, make sure you are dead center.
- Setup up the tripod and the panorama adapter: Make sure all legs of the tripod are properly extended and that it is stable.
- Fine-tune the composition: Use the spirit level mounted on the hot shoe to level your camera. Check the symmetry through your view finder. An ultra-wide-angle lens creates perspective distortion that amplifies any kind of asymmetry. Use the grid lines in your view finder to make sure that all horizontal lines in the scene are perfectly horizontal in you view finder. Rotate the camera up and down while you look through the view finder to make sure every section is perfectly aligned. You may have to move your tripod slightly to get a perfect composition. When you finally have the composition you want, check again whether the tripod has a stable stand and that your camera is level with the ground.
- Tighten all the screws: To make sure nothing come lose in the middle of the shoot, tighten all the screws again.
- Choose the lowest possible ISO sensitivity: This ensures that your images are free of noise.
- Choose the right aperture: When shooting hand-held you have to choose the widest possible aperture. As you are shooting from a tripod, you can use any aperture you want now. There are a few things to consider here:
- Sharpness: Usually, you want everything to be sharp in your final image. Thus, you should use a higher f-number. Use at least f/8 for optimal sharpness. Do not go beyond 16 as very small apertures decrease the sharpness of your images due to diffraction.
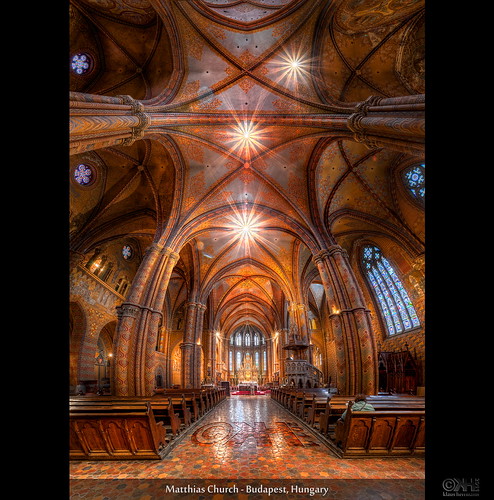
- Starbursts: If you would like to have the light sources in the image appear as starbursts like in the image at the start of this post, you should use apertures between f/11 and f/16.
- The 30-second limit: In low-light conditions, a low ISO sensitivity and small apertures will lead to very low shutter speeds. For example, the image at the start of this post was shot at ISO100 and f/11 with a 3-shot bracketing series of 0, -2, +2EV. This led to a shutter speed of 25 seconds for the +2EV shot. Note that most DSLRs only go up to 30 seconds. You can only go beyond that by using the Bulb mode, and this is not what you want. Thus, you need to make sure that the longest exposure stays below 30 seconds. To do this, put your camera in aperture priority mode (A on a Nikon, Av on a Canon), point it at a medium-lit section of your scene and read the shutter speed. The value should not exceed 7 seconds since the +2EV exposure will be four times longer than the value you just measured. If it is greater than 7 seconds, reduce the f-number and/or increase the ISO sensitivity. However, the latter is not recommended as it will introduce additional noise in your images.
- Making people disappear: Shutter speeds of several seconds will make moving people disappear. In a 25 second exposure, a person walking through the frame at normal walking speed will be barely visible in the final image. This may help you in dealing with people in crowded places.
- Measure the scene: Once you have found the right aperture, memorize the resulting shutter speed, put the camera in manual mode and set the measured shutter speed.
- Focus: Focus using the autofocus system and put the lens into manual focus mode afterwards. This ensures that each image will have the same focus, avoiding any problems in the stitching process.
- AEB mode: Put your camera in AEB mode with +-2EV (or more if your camera allows it).
- Take a test shot and check for sharpness by zooming in on your display. Also check for correct exposure using the histogram.
- Final Preparation: Now the setup of tripod, panorama adapter, and camera is finished, and it is time for the final preparation:
- Activate the self-timer with a delay of about 2 seconds. Alternatively, you may use a remote or cable release. Note however, that the corresponding sockets may not be accessible as the panorama adapter blocks them. A self-timer with a small delay ensures that your camera settles down after you pressed the shutter release button.
- Activate the mirror lock-up mode. This makes sure that the vibration caused by the mirror flipping up dies out before the shutter is opened. This also helps you in getting sharp images.
- Activate the raw mode of the camera for maximum quality and to be able to freely modify the white balance in post-processing.
- The shoot: Now you are set to go.
- Rotate the camera such that it points straight down. This will be your first section. On these images, you tripod and maybe also your feet will be visible. Of course, we do not want this to be in the final vertorama. However, it gives us enough extra space at the bottom to play with in post-processing.
- Wait for the right moment. The overall shoot may well take several minutes due to the long shutter speeds. But still, you may want to wait for people to pass by or for the sun to come out again etc.
- Shoot the first section: Press the shutter release and wait for the camera to do its job.
- Rotate the camera for the next section and shoot in the same way.
- Repeat this until the camera is pointing straight up for the last section.
- The final check: Once you have shot all the sections, flip through the images on your camera display to make sure everything is fine.
That’s it! Now you can go home and have fun stitching and tone-mapping the images.
Copyright notice: The copyright to all the products and trademarks mentioned on this page belong to the respective companies. All the images were shot by me and may not be used without permission.
Please Refer to This Page!
Did you find this tutorial helpful? Did you use it in your work? Then there is a simple way of giving something back to me:
Please refer to this page when presenting your work online. You can simply use the following HTML code in your image description to refer to this site in a way that you think is appropriate:
<a href=”https://farbspiel.wordpress.com/”>HDR Cookbook</a>
Why should you bother to refer to this page? Well, for you it is a convenient way of revealing information about your work. And you know, the more information you give, the more attention you get. You do not need to write a whole novel because I already did this for you here. For me, the reference is beneficial because it generates some attention for this cookbook.
So, you see that referring to this page is good for both of us – a real win-win situation. 🙂
Thanks!
Filed under: HDR Cookbook | Tagged: farbspiel, hdr, hdr panorama, hdr panorama workflow, hdr vertorama, hdri, panorama adapter, panorama head |

Hi,
first of all thank you for sharing your knowledge with us and for your entire work, it is very inspiring !
I would like to ask if there are differences between vertoramas with camera in landscape or portrait mode.
If I use a panoramic head (nodal ninja) the default option is to use camera in portrait mode. Could be any advantages in stitching process due to increased vertical field (less deformations) ?
Perhaps the drawback is that you must take more pictures (left, right).
Thank you !
Dan
Hi Dan,
thanks for the feedback!
With respect to the camera orientation: The reason for taking the individual shots for a panorama in portrait orientation (landscape for vertoramas – see animation in this post) is simple the larger vertical field of view. In other words, you will be able to fit more of the scene into your panorama on the vertical axis while you can simply shoot 1 or 2 additional shots in the horizontal axis. Shooting single-row panoramas in landscape orientation usually results on “long and thin” images. Using portrait orientation makes them a bit “thicker”.
In terms of stitching, there should not be that much of a difference as long as you make sure that your images have enough overlap.
I hope this helps!
Cheers
Klaus
[…] make sure you read Farbspiel’s HDR Cookbook posts: Taking Interior HDR Vertorama Shots and Taking HDR Vertorama Shots with a Tripod where extremely detailed description of the shooting process as well as useful tips and advice are […]
[…] https://farbspiel.wordpress.com/2011/05/13/hdr-cookbook-taking-hdr-vertorama-shots-with-a-tripod Share this:DiggRedditLike this:LikeBe the first to like this post. This entry was posted in Uncategorized by fozbaca. Bookmark the permalink. […]
[…] need a special adapter in order to place your camera in landscape orientation. Once again, refer to Farbspiel’s HDR Cookbook, the most comprehensive panorama shooting manual I managed to find on the Web, where Klaus […]